
Healthmaster® provides this guide as a resource guide for the configuration and use of HealthOffice Anywhere.
Healthmaster® and its employees are not representatives nor takes responsibility for state, district, or individual school regulations and processes mandated for documentation of student records.
This guideline is representative of the HealthOffice Anywhere product setup and configuration. It does not include guidance on Medicaid billing, Health Portal, or Advanced Reporting. These products are detailed in separate guidelines.
Guide Users
This guideline is intended for the following users:
Qualifications
If you have additional questions regarding HealthOffice Anywhere configuration,
please contact us by phone at 1-800-732-7317 or email support@healthmaster.com.
District
The first step in the configuration process is to add your District (or Health Department) to the program.
 Add your district
- Hover over the Administration Menu, Districts, Regions and Schools, then click Districts.
- To search for a district, enter the search criteria and click Run.
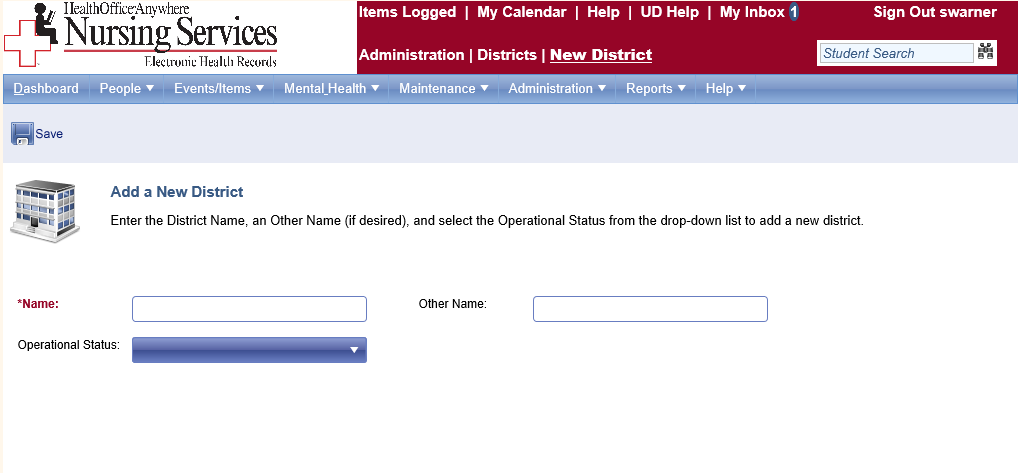
- To create a new district, click New.
- Enter the name of the district. Select Open as the Operational Status.
- Click Save.
Region (Optional)
If you have a large district that is divided into regions, follow the steps below to identify each one.
Identify a region
- Hover over the Administration Menu, Districts, Regions and Schools, then click Regions.
- To search for a region, enter the search criteria and click Run.
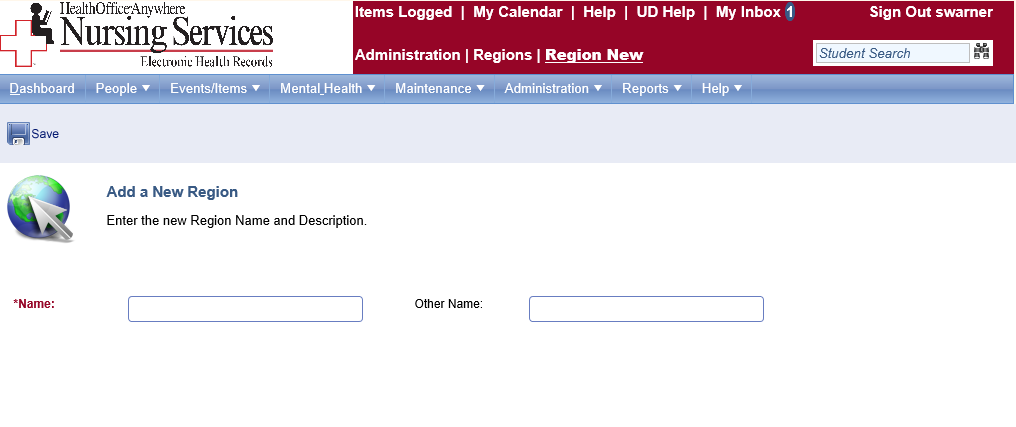
- To create a new region, click New.
- Enter the name of the region.
- Click Save.
Schools
Schools must be added in HealthOffice Anywhere before you go any further. The information created in schools is the foundation for many other configuration steps. For example, schools are needed for assigning schools to users, creating calendars, and enrollment for student records imported from a student information system (SIS) or migrated from older versions of HealthOffice.
Add schools
- Hover over the Administration Menu, Districts, Regions and Schools, then click Schools.
- To search for a created school, enter the search criteria and click Run.
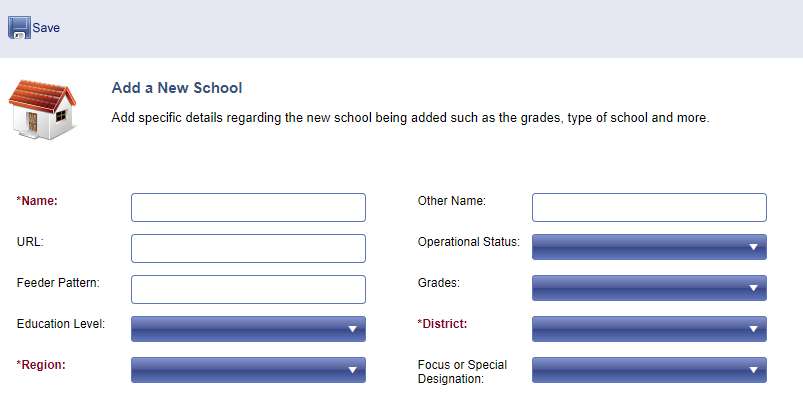
- To create a new school, click New.
- Enter the school’s information, focusing on the Grades field and the required (red) fields.
- Click Save.
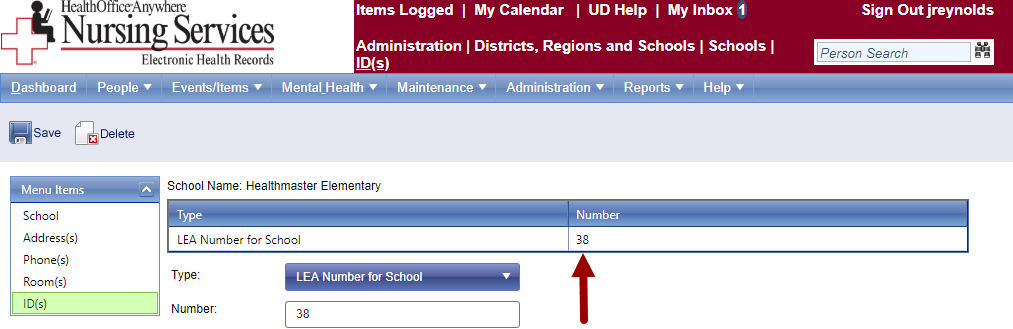
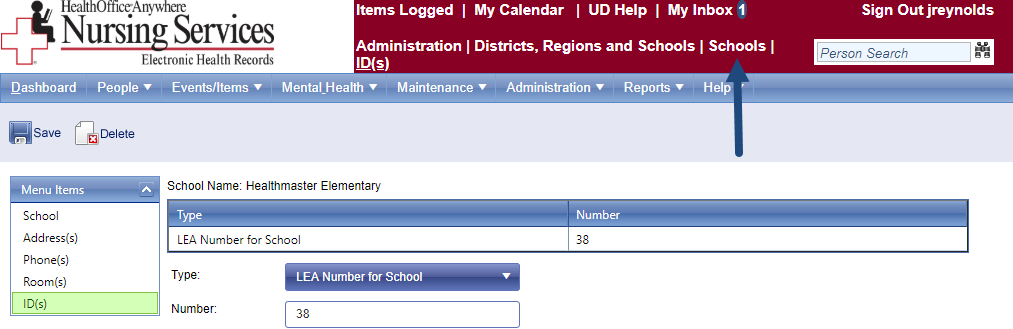
- Click ID(s) from the menu that appears on the left.
- In the Type field, select “LEA Number for the School.”
- Enter the LEA number
- Click Save.
- The school’s LEA number is added.
- In the red box at the top of the page, click Schools to return to the school search screen.
- Repeat the above process until all schools are added.
Track Year
A track year identifies the important dates for a school district. It directly affects scheduled services, reports, and other key areas used every day.
Set up a track year
- Hover over the Administration Menu, Districts, Regions and Schools, then click Tracks.
- To search for a current track year, enter the search criteria and click Run.
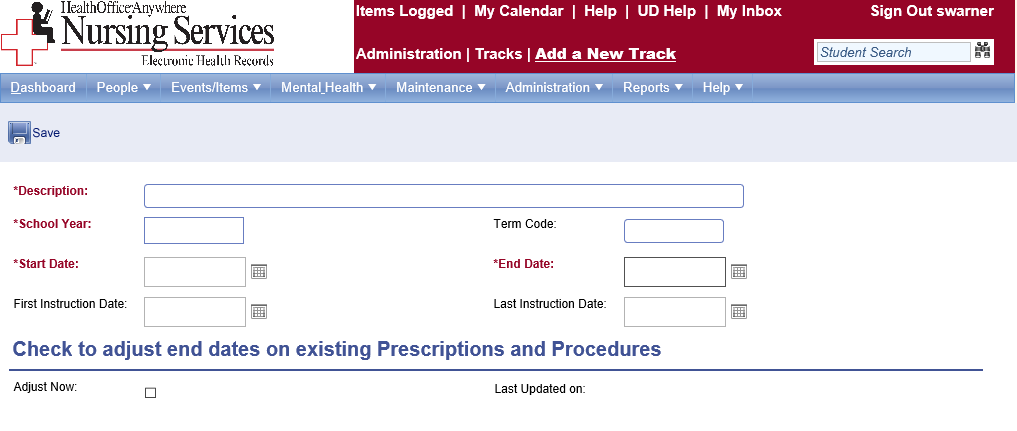
- To create a new track year, click New.
- Complete all required (red) fields.
- Click Save.
 Extend school year dates
- You use the Adjust Now checkbox to extend the dates of the school year.
- This carries all scheduled encounters forward to the new end date.
Activate a Track Year
Once a Track Year is created, it needs to be activated to make the change within the database. This works with the import from the student information system.
Activate a track year
- Hover over the Administration Menu, System Settings, then select System Parameters.
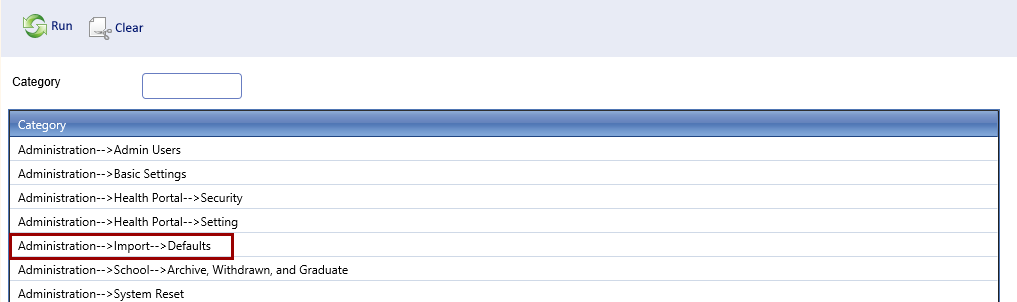
- Click Run to generate all System Parameters.
- Select Administration -> Import -> Defaults.
- Click on the track year drop field and select the track year you just created.
- Click Save.
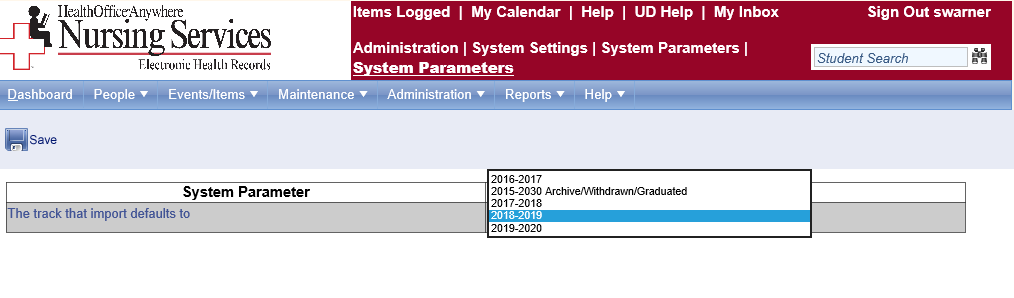
- The new track year is active once the database is refreshed.
Schools Closing and Activity
School Closing and Activity is where the district adds all holidays, professional development days, inclement weather days, and any other time when scheduled items in HealthOffice Anywhere will not be documented. Dates may be added at any time during the school year.
The goal is to add in all dates for the school year that effect the students.
Add dates to the School Closing and Activity calendar
- Hover over the Maintenance Menu, then click on School Closing and Activity.
- Click Month to change the view of the calendar from a week view to a month view.
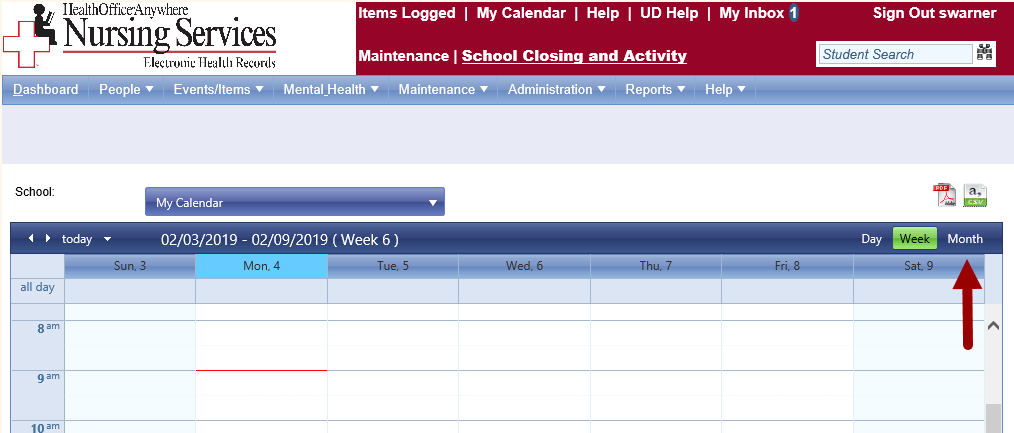
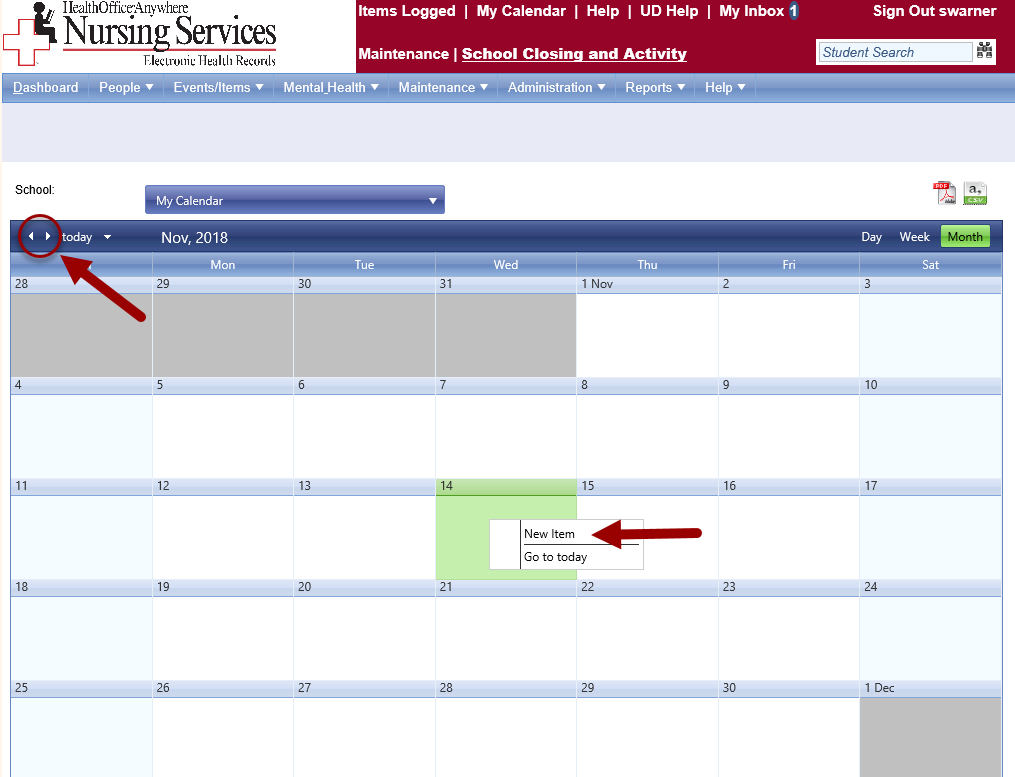
- Adjust the month view by using the arrows on the upper left to move forward or backward.
- Click on the date school is closed.
- Choose New Item.
- Complete all required fields in the New Item box.
- For consecutive days off, use the first day off as the start date and the last day off as the end date.
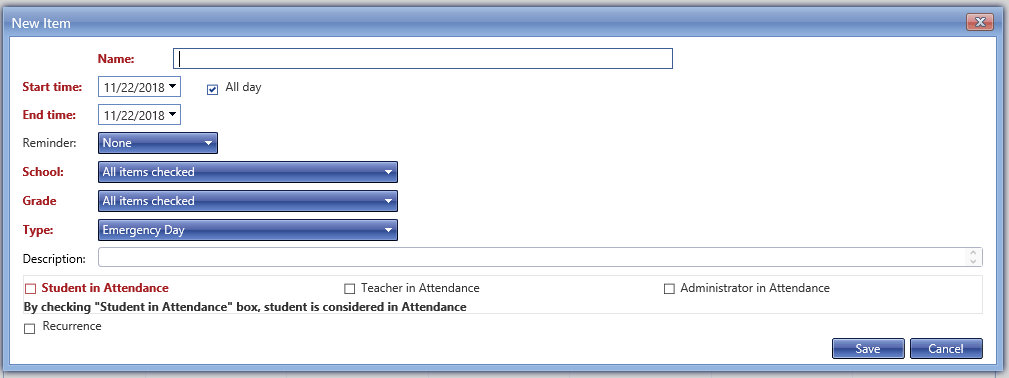
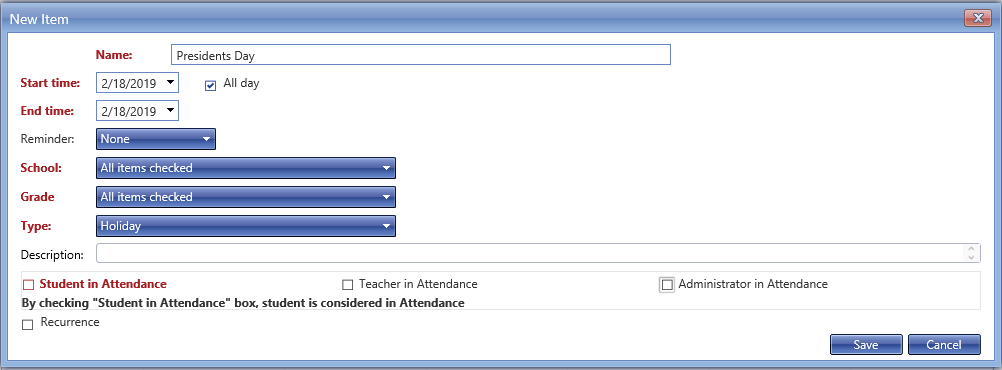
- Name: The name of the day off, for example, “Thanksgiving” or “President’s Day.”
- Start/End Time and All Day: The date or dates off. Check All Day if the day off is the full school day.
- Reminder: A pop-up reminder about the day(s) off.
- School and Grade: The schools and grades associated with this day off.
- Type: Identify the type of day off (emergency day, holiday, etc.).
- Description: Optional
- Recurrence: Select this option to open parameters to set this day(s) off to recur. An example of recurrence would be a professional development day that occurs on the first Tuesday of every month.
- Check the appropriate boxes to indicate who will be in attendance. Leave all the checkboxes unchecked if no one will be in attendance.
- Click Save on the bottom right. The date is added to the district calendar.
- Repeat the process to add additional dates.
Roles
A role identifies what permission a group of users has in HealthOffice Anywhere. It identifies what the users can see, do, report, edit, etc. HealthOffice Anywhere comes with several standard roles that your district may customize, or you can create new ones. There is no limit to the number of roles a district may have.
Create a Role
- Hover over the Administration Menu, Security, and click Roles.
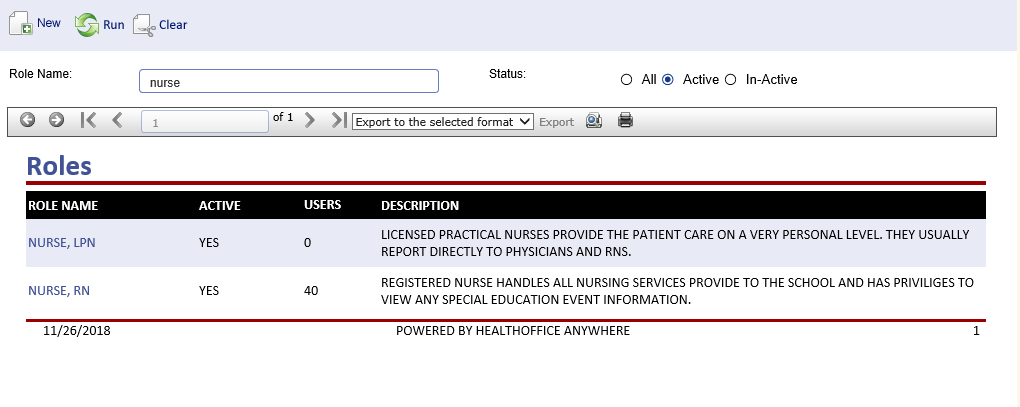
- To search for a created role, enter search criteria and click Run.
- To create a new role, click New.
- Name the Role and check Active.
- A Role Description is optional. It is helpful when there are many similar roles.
- Select all the options that apply to this role. Options include user dashboard elements, the view of the student record, and other features.
- Click Save.
- Several new menus appear on the left. Navigate through each menu to add and remove permissions to the role.
- You must click Save within each menu.

Role Menu Items
Work though each menu on the left to customize the role. You may adjust permissions or skip entire menus if they do not apply to the specific role.
Save your changes
- You must save your changes on each menu page before moving on, otherwise you will lose them.
- You can return to and update roles at any time.
| Menu Item | Description |
| Administration Menu |
Settings that apply to the administration of the HealthOffice Anywhere program. Items include global templates, password and account maintenance, static and text lists, or schools’ districts. Often My User Settings is the only administration setting selected for non-administrative roles. |
| Billing Menu |
Role permissions for documenting and processing Medicaid billing services through HealthOffice Anywhere. These permissions will only appear and should only be used by HealthOffice Anywhere customers with a signed Healthmaster billing agreement. |
| Events/Items Menu |
Role permission for a variety of exams, encounters, and daily activities. Choose the permission for users based on the type of documentation. Remember, when multiple roles have the same Events/Items active, they will share the data. |
| Maintenance Menu |
Role permissions where the work inside the student record is identified. These permissions identify student configuration and established care for students with known procedures. These include the ability to add or edit student care plans and letters, immunization histories, medical problems, medical procedures, and prescriptions. |
| Mental Health Menu |
This menu is no longer used. Mental and behavioral health features are now managed through other menus. |
| People Menu |
A set of permissions for student and person (non-student) records. |
| Reports Menu |
Permission settings for reports in HealthOffice Anywhere. In some areas of HealthOffice Anywhere, there are several reports that provide a variety of results for the same function. Choose the reports that best apply to the users in this role. |
| Special Education Menu |
Permissions to add or remove special education encounters to the role. For example, speech, occupational, and physical therapies, etc. |
Modify a Role
- Hover over the Administration Menu and Security. Click Roles.
- Search for the role by name or status.
- Click Run.
- Click the role to open it.
- Make any needed changes to the role using the menu items on the left.
- Move permissions between Denied (on the top) and Granted (on the bottom).
- Double click the permission line to move it or use the green arrows in the middle.
- Click Save.
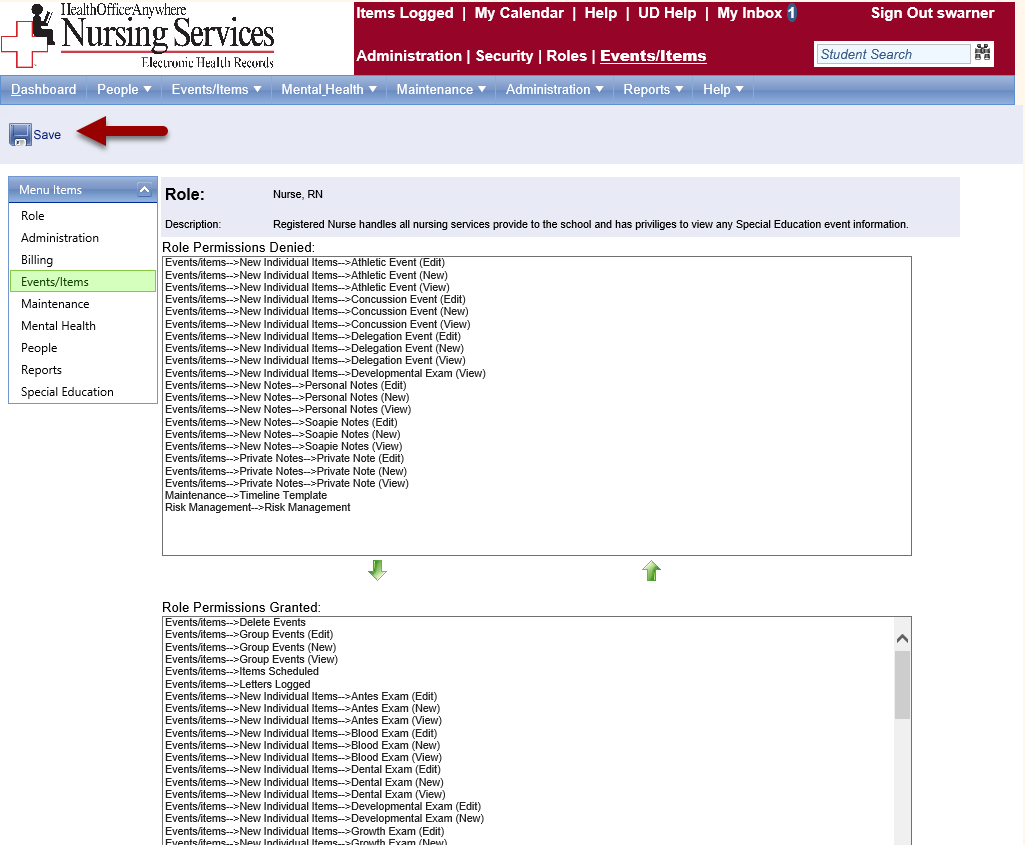
- Click Save before moving on to the next menu.
- Click to the next menu on the left and repeat the above steps.
User Accounts
The user account identifies the user and their role in HealthOffice Anywhere. User Accounts is where you identify the school(s) the user has rights to. Each district adds user accounts so that every person working in HealthOffice Anywhere has a unique account. Specific user accounts are tied to all documentation in HealthOffice Anywhere.
Create a User Account
Create a User Account
- From the Administration Menu, hover over Security and select User Accounts.
- To search for a user, use the filter fields and click Run.
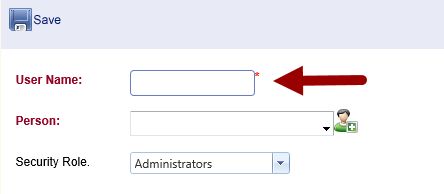
- To add a new user account, click New.
- Enter the user name. Healthmaster’s user name protocol is the person’s first initial and last name.
Users with the same last name
- If you have several users with the same last name, you may adjust the username to differentiate between users.
- Numbers are allowed in usernames.
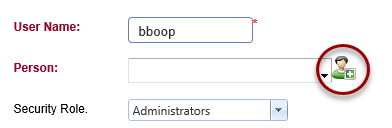
- Click Save.
- Every user in HealthOffice Anywhere is tied to a person record. If the person already exists in HealthOffice Anywhere, click the person field and use the filters to find them.
- If the person is brand new to the district, click the Add Person icon.
- Enter the required information (red fields) and all additional information that applies.
- Click Save (blue icon in the lower right).

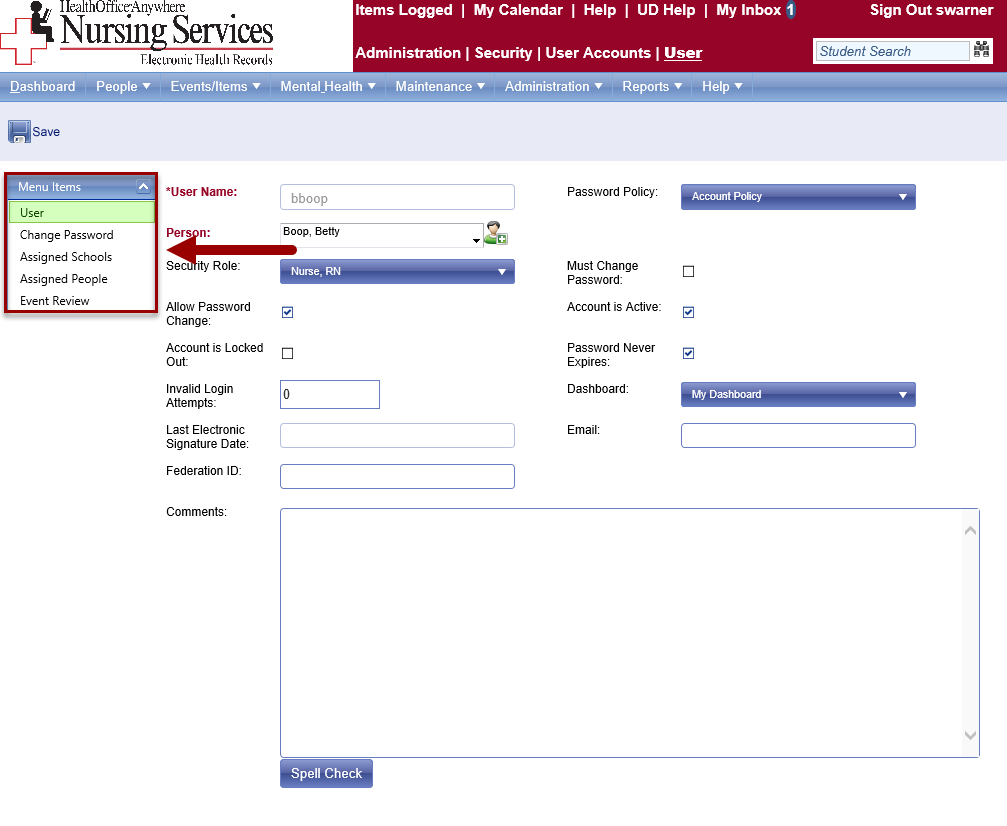
- Select the security role for the user. This is based on the roles you have created for the district.
- Enter the user’s password. Follow your district password protocol. The original password created for each user is a temporary password. The standard procedure is to force each user to set their own password upon initial log in.
- Check Account is Active.
- Check Allow Password Change
- Check Must Change Password.
- Add the user’s email address.
- Click Save.
- The user account is created.
- A new set of menus appear on the left to further specify the user’s access.
- Click Assigned Schools.
- Click the Assigned Schools field, and check the schools associated with the user.
- Click Save.
- To create the next user account, click “User Accounts” in the red box at the top of the screen to return to the beginning screen.

Advanced User Account Settings
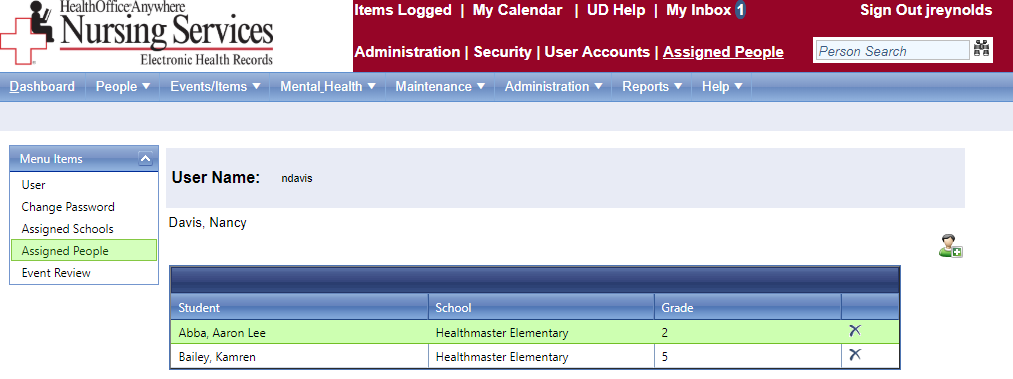
Assign People: This is an advanced feature used for those users who only work with specific students, not the school’s general population. When students are assigned, the user will only see these students and no others.
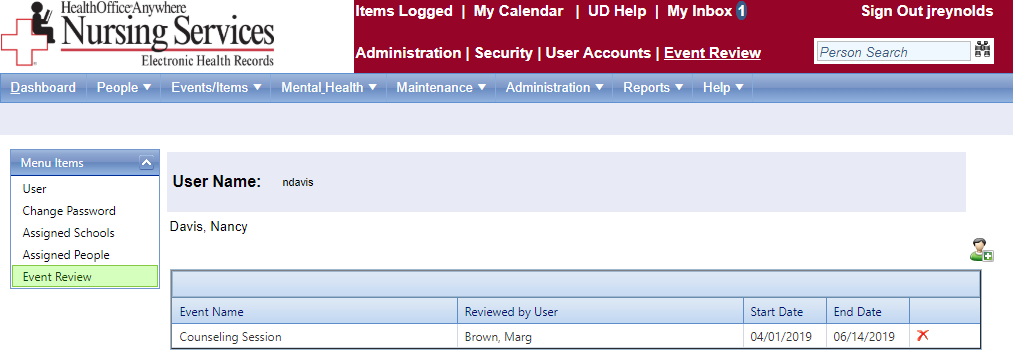
Event Review:This is an advanced feature used to review documentation saved by a user through a “send and review” process with the user’s supervisor or assigned reviewer.
Cache Reset
Many of the areas for product customization require a cache reset of your database to apply the changes. This request must come to Healthmaster Support at 1-800-732-7317 or Support@Healthmaster.com by a district leader. The cache reset process will log out any logged in user, so Healthmaster recommends that this is done at the end of the school day to minimize the impact on the users.
System Parameters
System Parameters is where your district can customize many features of HealthOffice at the database level. You can make these adjustments at any time. System Parameter functionality is always changing and expanding. The easiest way to see all the current options is to search the System Parameters screen without any filter criteria. You will see the options available to your district. An appendix to this guideline contains all the current system parameter options.
System Parameter Changes
Healthmaster does not recommend making System Parameter changes without full knowledge of the setting’s functionality. If you would like more information about a specific setting in System Parameters, contact Healthmaster’s implementation coordinator, or Healthmaster Support by phone 1-800-732-7317 or email Support@Healthmaster.com.
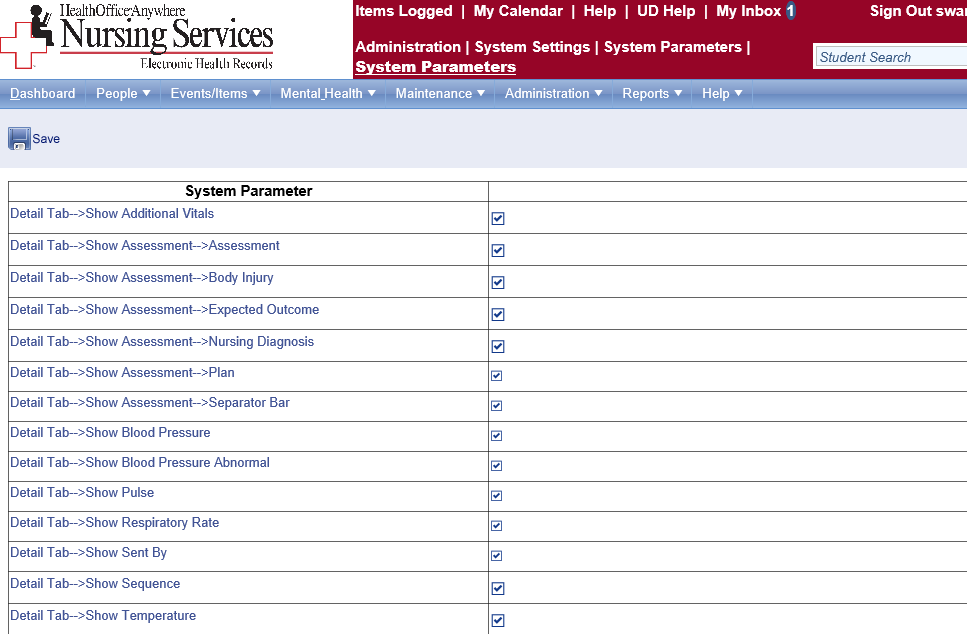
Set Office Visit system parameters
- Hover over the Administration Menu and System Settings. Click System Parameters.
- Click Run. The System Parameter list is organized first by location in the program menus, and then by specific feature.
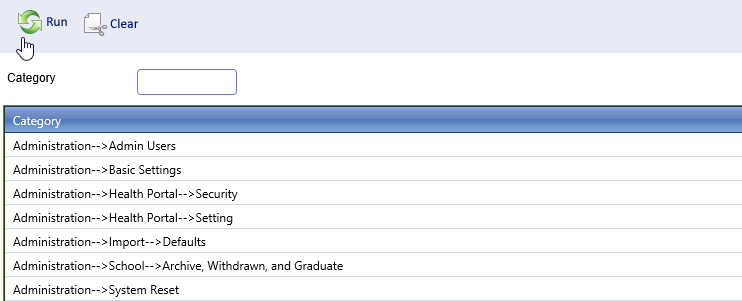
- Find Event/Items -> Office Visit. Click it to open.
- To remove/disable an element of the Office Visit, uncheck it, then click Save.
Remove Incidents
If you want to remove incidents, you must leave at least one incident setting active.
- Click Save.
- Click on System Parameter in the red box to return to the search screen.
- Repeat the above steps for any additional System Parameter changes.
- For System Parameter changes to take effect, you must contact Healthmaster Support and ask for a cache reset. This request must come to Healthmaster Support at 1-800-732-7317 or Support@Healthmaster.com by a district leader. The cache reset process will log out any logged in user, so Healthmaster recommends that this is done at the end of the school day to minimize the impact on the users
Care Plan and Letter Template Configuration
Care Plan and Letter Templates are created by an administrative HealthOffice Anywhere user. Once created, they can be used by anyone with rights to create Care Plans and Letters.
There are two ways to create a new Care Plan or Letter Template. You can either bring in a template that already exists in a word processing program or create it from scratch within the editor. Once it is created, you can insert merge fields into the template (merge fields place student specific information into the identified location).
Changeable
Documents
- Care Plan and Letter Templates can be edited or deleted at any time.
Create a New Letter or Care Plan Template
Create a new letter or care plan template
- Hover over the Maintenance Menu then click on Care Plan and Letter Templates.
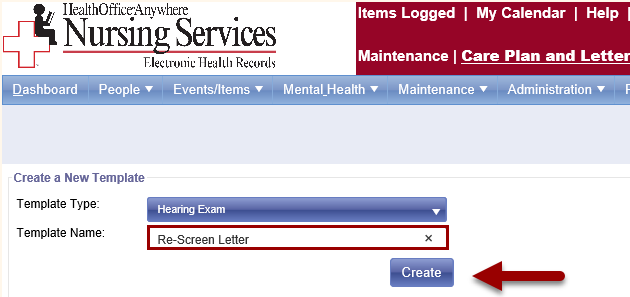
- To create a new template, use the “Create a New Template” section.
- Select the template type from the drop list.
- The template type that you select determines where in HealthOffice Anywhere this template can be used. For example, if you select “Hearing Exam” here, this template can be used within a Hearing Exam.
- Name the template something that will be recognized and understood by your team.
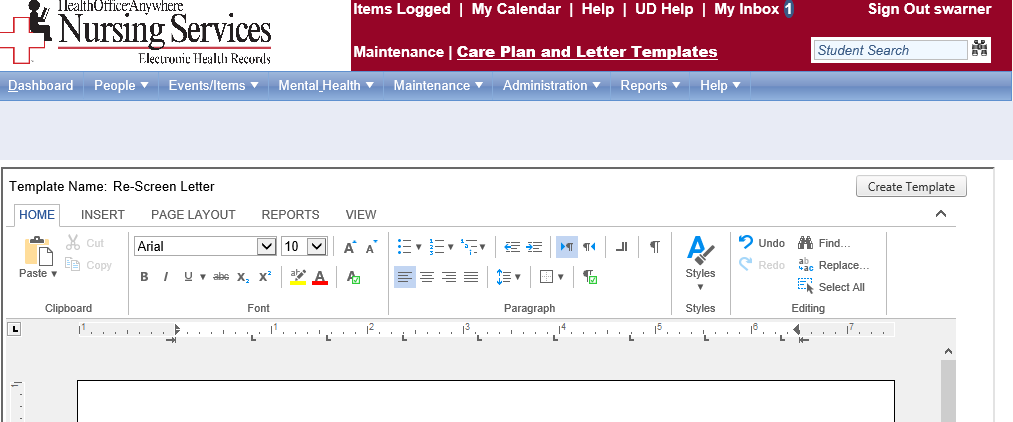
- Click Create.
- There are two ways to create a new template:
- Create a new Care Plan or Letter Template from scratch. Use the editor like a word processor to create the template.
- Use an existing template (in a Microsoft Word format) that you drag and drop into the editor. When you drag and drop a document, it maintains existing formatting.
Use Drag and DropUsing an existing template that you drag and drop into the editor is the suggested way to create a template.
- To drag and drop an existing document:
- Open a file explorer window and find the template document.
- Reduce the size of your HealthOffice Anywhere window so that you can see both the text editor in HealthOffice Anywhere and the file explorer window.
- Select the document from the file explorer window (click and hold down the mouse button), drag it onto the template editor window in HealthOffice Anywhere, then drop it (release the button on your mouse).
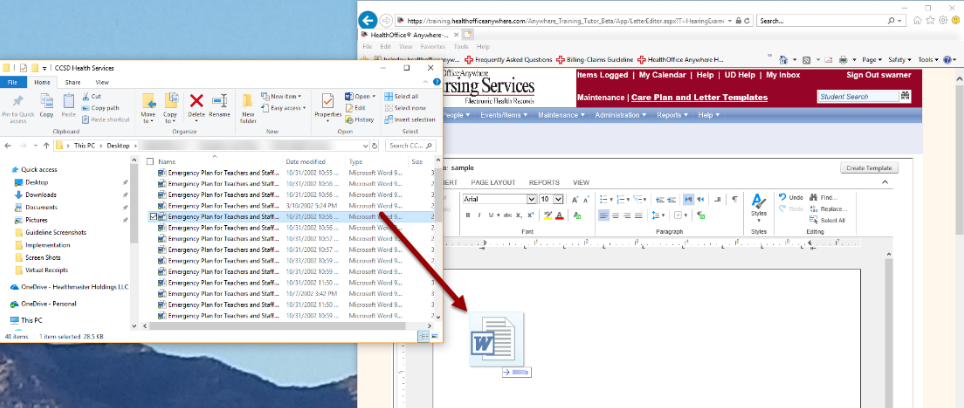
- The template appears in the workspace of the template editor.
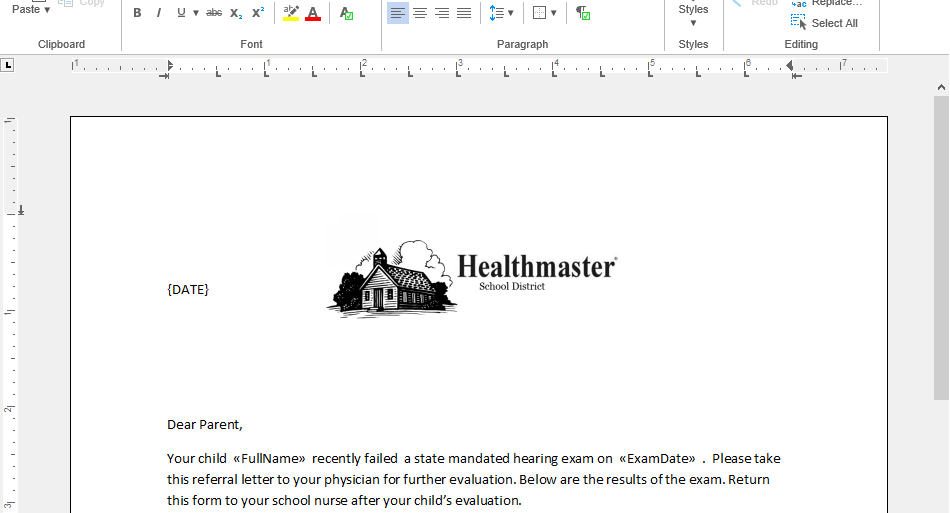
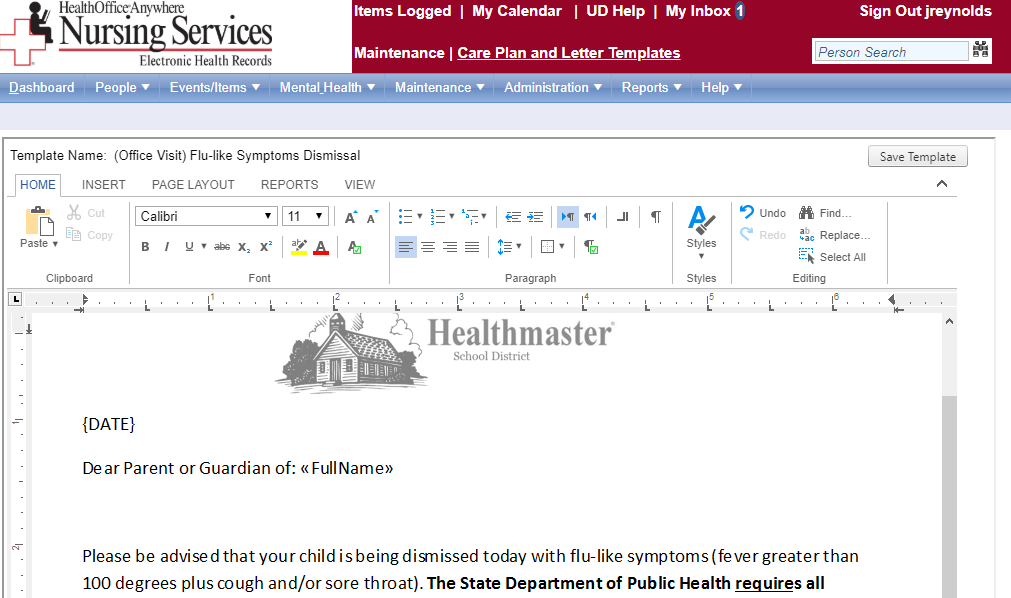
- You can make any needed modifications to the letter or care plan template.
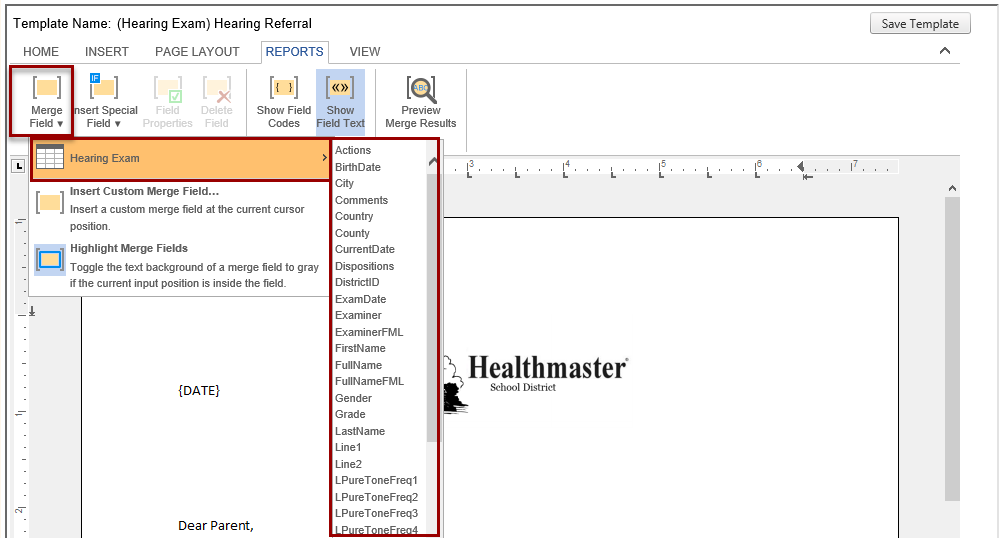
- To insert merge fields into the template:
- Click where you would like the merge field to go in the template.
- Within the template editor window towards the top, click Reports.
- Click Merge Field, then hover over the event type.
- A list of merge field options appears. Click the merge field to insert.
- To add another merge field, repeat the above process.
- Click the Create Template button in the upper right side of the editor window.
- Repeat this process to create more templates.There is not a limit to the number of Care Plan and Letter Templates that a district can create.
Edit or Delete a Care Plan or Letter Template
Edit or deactivate a global template
- To edit or delete an existing Care Plan or Letter Template, navigate to the Care Plan and Letter Template screen.
- Use the “Edit an Existing Template” section and select the template from the Template Name dropdown.
- To open the template to edit it, click Open.
- Make any needed adjustments to the template.
- Click Save Template in the upper right.
- To delete the template, click Delete.

Static/Text List Configuration
There are list field options on almost every screen within HealthOffice Anywhere. Many of the lists can be adjusted to fit your district’s needs.
There are two different types of lists:
- Static Lists – Static list items can be deactivated, but new items cannot be added.
- Text Lists – Text list items can be deactivated, and new list items may be added.
When you configure the Static and Text Lists for your district, focus on the lists that you use. For example, if your district does not bill with Healthmaster, skip the lists associated with billing. Healthmaster recommends you work with the discipline leaders during list configuration to ensure the documentation needs of your entire team are addressed.
There are several lists that are used in multiple locations, for example, Results/Outcomes, Actions, and Dispositions (RAD) are lists that appear in all encounter documentation. These lists should be configured to meet your district’s needs.
The Text and Static List (6007) report details every list field. It can be generated by list category and status of the list item.
Make a List Item Inactive / Active
Make a list item inactive /active
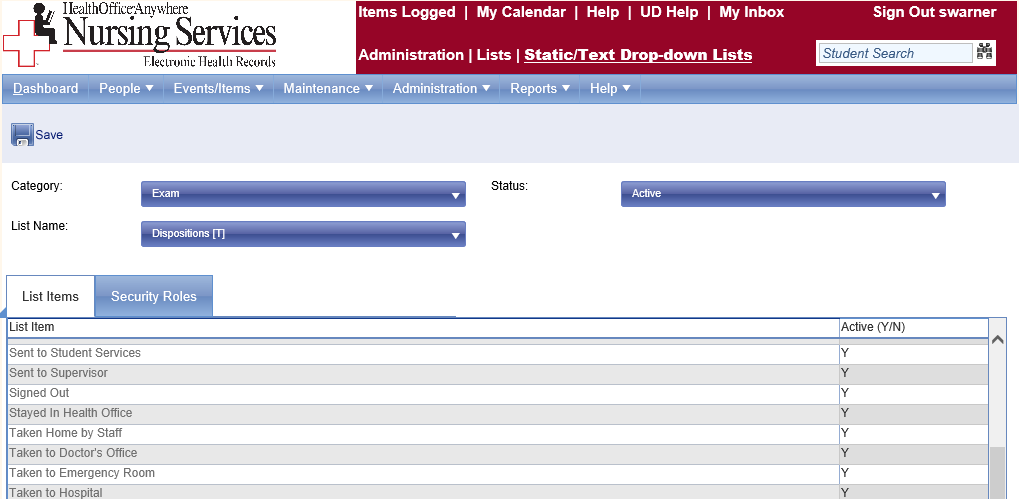
- Hover over the Administration Menu, Lists, then click Static/Text Drop-down Lists.
- Lists are organized by category (content). Click the Category dropdown to select the content area of HealthOffice Anywhere.
- Active list items are shown by default. To look for inactive list items, change the Status field to inactive.
- There are multiple lists within each category. Select the List Name to load the specific list items.
- An [S] at the end of the list name indicates the list is a Static List.
- A [T] at the end of the list name indicates the list is a Text List.
- To deactivate a list item, use your keyboard to change the “Y” to “N” in the Active column.
- To activate a list item, use your keyboard to change the “N” to “Y” in the Active column.
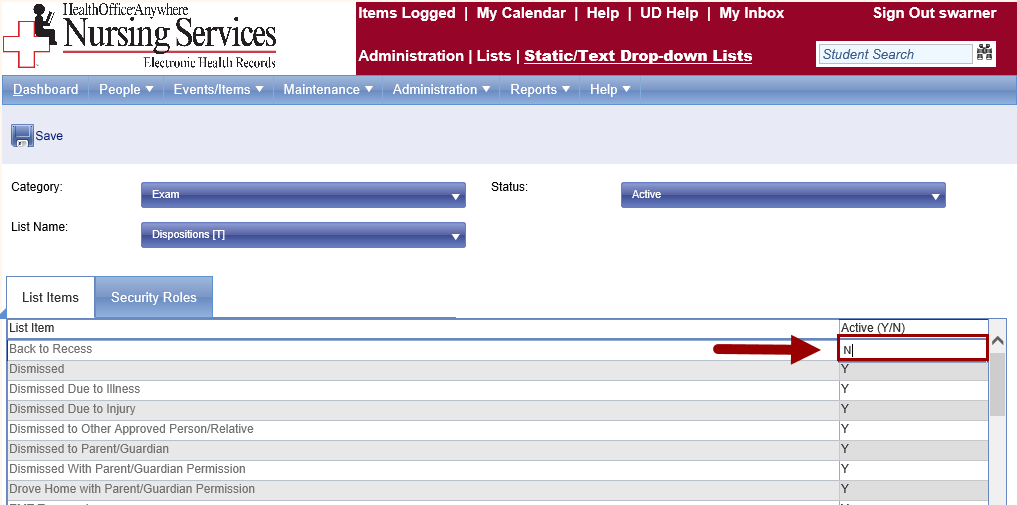
- Make any adjustments to the displayed list items. You must click Save at the top of the screen before adjusting which list items are displayed.
Commonly Adjusted Lists
| List Name | Category |
| Results / Outcomes | Exam |
| Actions | Exam |
| Dispositions | Exam |
| Referred By | Exam |
| Exam Location | Exam |
| System Group / Condition | System Group/Condition |
| Treatments / Interventions | Exam Office Visit |
| Medical Alert | Student/Person |
Add a New List Item
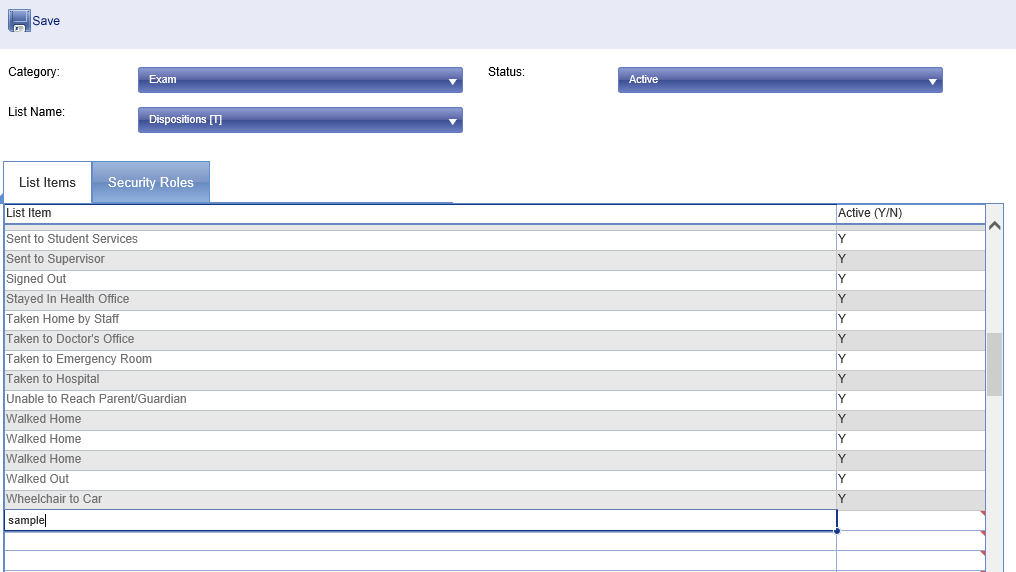
Add a new list item
- Using the Category and List Name fields, locate the list.
- Scroll to the bottom of the screen until you see blank rows.
- Click in a blank row and type in the new list item.
- Type a “Y” in the active column.
- Add as many items to this list as you want.
- Click Save at the top of the screen.
Assign List Items to User Roles
There may be times when multiple roles use the same list, and each role has different list items unique to their role in the district. For example, a Health Aid may not do the same treatments as a Registered Nurse, so the list items in that section can be assigned to the appropriate user role. A user will only see the list items assigned to their role.
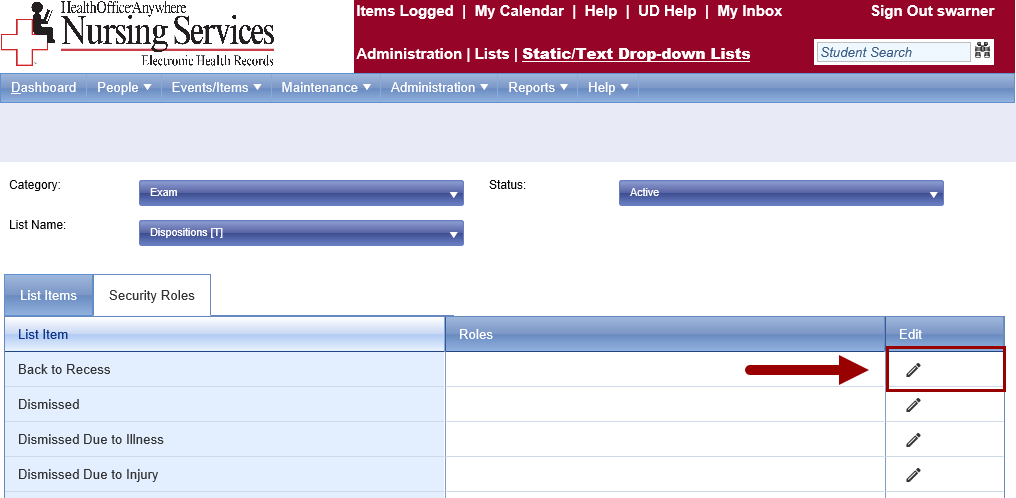
Assign list items to user roles
- Use the Category and List Name fields to locate the list items you want to assign.
- Click the Security Role tab at the top of the List Items grid.
- Click the Edit button (pencil icon) to the right of the list item to assign.
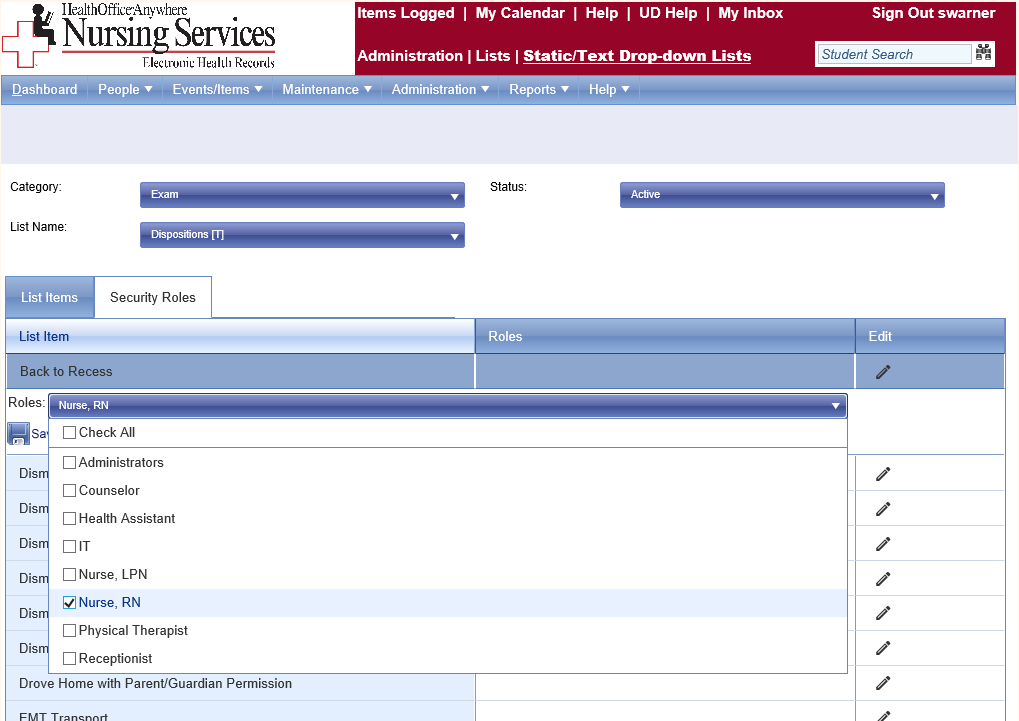
- Click the Roles field.
- Click the checkbox next to all the roles who need to see this list item. Only the roles selected will see the item. Any roles left unchecked will no longer have the item as an option.
- If all user roles should have the item as a list option, leave all the roles unchecked.
- Click Save directly below the Roles field.
Common Field Lists to Customize First
- Results / Outcomes (Category = Exam)
- Actions (Category = Exam)
- Dispositions (Category = Exam)
- Referred By (Category = Exam)
- Exam Location (Category = Exam)
- System Group / Condition (Category = System Group/Condition)
- Treatments / Interventions (Category = Exam Office Visit)
- Medical Alert (Category = Student/Person)
Global Event Templates
There are many reasons to configure Global Event Templates for your district:
- Global Templates speed up encounter documentation.
- Global Templates promote consistent documentation.
- Global Templates may be assigned to specific user roles.
- There is no limit to the number of Global Event Templates a district may create.
HealthOffice Anywhere comes populated with templates that can be used, modified, or deactivated at any time by an administrative user.
Create a Global Template
Create a new global template
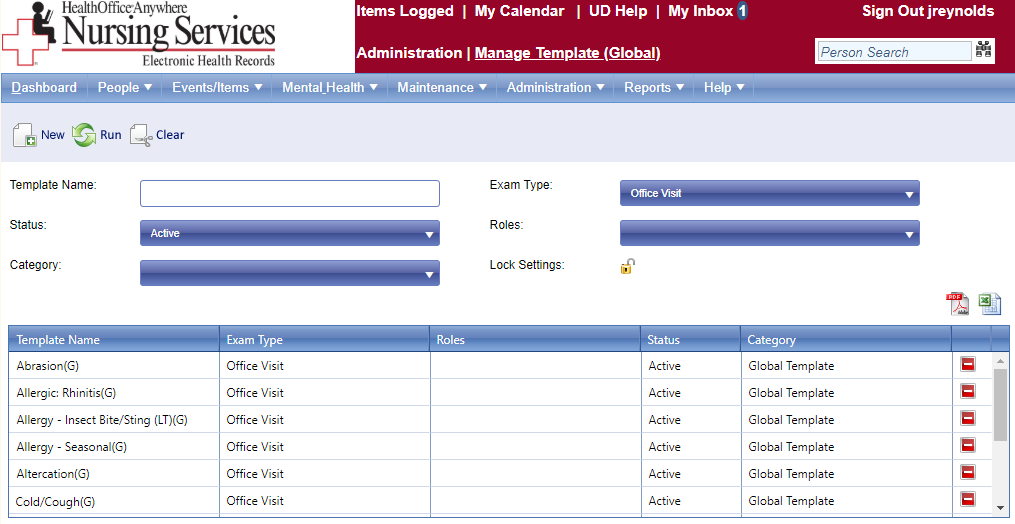
- Hover over the Administration Menu then click on Manage Templates (Global).
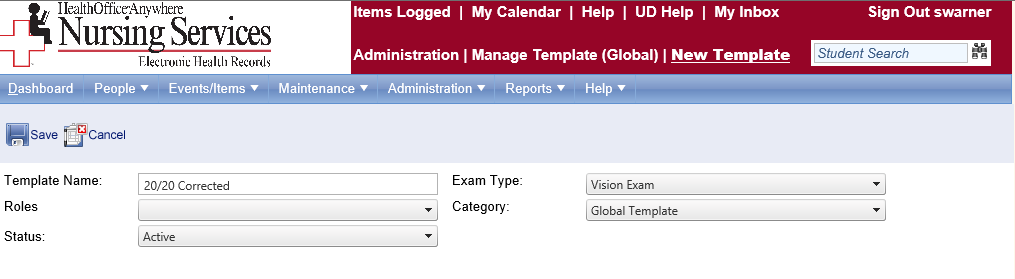
- To create a new Global Template, click New.
- Enter a Template Name. Healthmaster suggests that the template name include the presenting issue, or language your team will understand.
- Select the event type that this template is for from the Exam Type field.
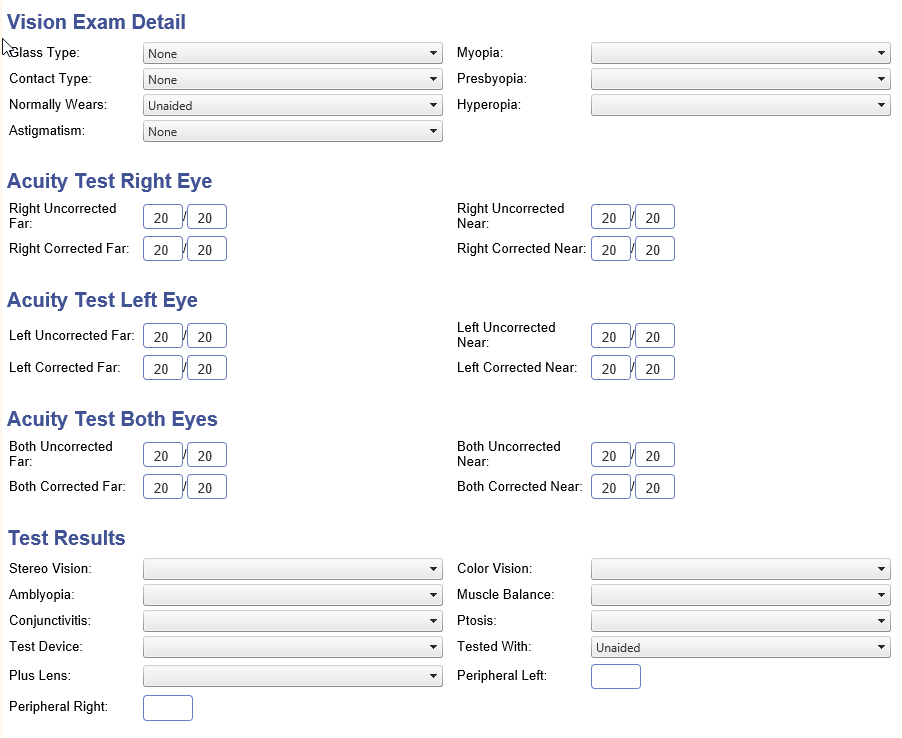
- Select the appropriate list items for this Global Template.
- Common (shared) event fields, including RAD and comments, appear at the top of the template screen.
- The fields specific to the event type are towards the bottom.
- When the Global Template is complete, click Save at the top.
- To create another template, use the breadcrumb in the red box to navigate back to the Manage Template (Global) screen and repeat the process.

Edit or Deactivate a Global Template
Edit or deactiate a global template
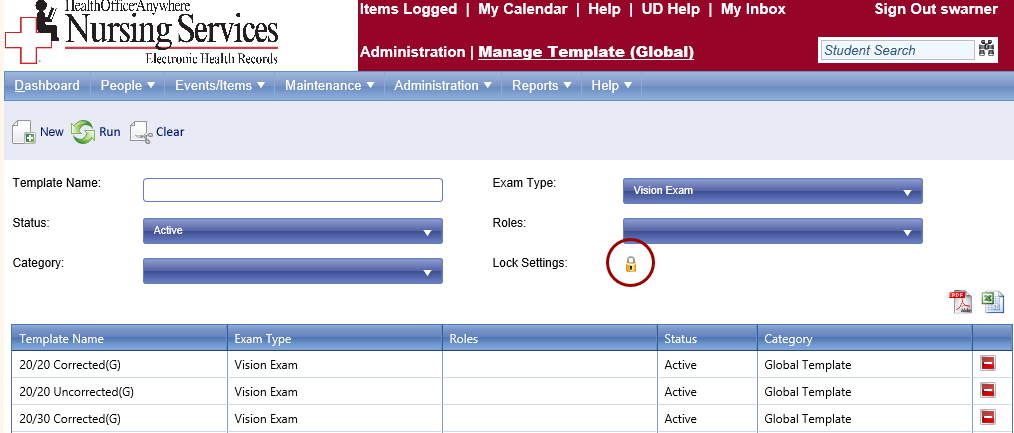
- Hover over the Administration Menu then click on Manage Templates (Global).
- To search for a Global Template, use the filter fields and click Run. The templates that fit the filter criteria appear below.
- If you are going to edit multiple templates from the same search results, click the Lock Settings icon to maintain the search results.

- Select the appropriate list items for this Global Template.
- To edit a template, click the template name.
- Make changes to any of the fields.
- Click Save at the top of the screen.
- To edit another template, click in the red box to navigate back to the Manage Template (Global) screen and repeat the process.
- Click the Lock Settings icon to unlock the search filter settings
List of System Parameters
The following Table Identifies the System Parameters currently found in HealthOffice Anywhere.
| Category | Description |
| Administration → Admin Users | Not Applicable |
| Administration → Basic Settings | Work day, Dashboard, Portal, UD Help |
| Administration → Health Portal → Security | Settings to configure what elements of the Health Portal are used |
| Administration → Health Portal → Settings | Settings to configure what elements of the Health Portal are seen by the users (Internally and externally) |
| Administration → Import → Defaults | Setting the default track year that applies to the student import file |
| Administration → School → Archive, Withdrawn and Graduate | Identify the track year and possibly the specific school that holds the Archive, Withdrawn and Graduate students |
| Administration → System Reset | Resets HealthOffice Anywhere back to default settings |
| Billing → Dashboard | Area to set expectation levels district will reach to bill in HealthOffice Anywhere |
| Billing → Event Billing Control | Toggle to show diagnosis and procedure code descriptions on or off |
| Billing → Event Type Allowed to Bill | Area to select billable events for the organization |
| Billing → Event Type Requires Authentication to Bill | Events selected to process for billing authentication rules |
| Billing → Medicaid Processing Rules | Requirements to process, mailing address, SSI, etc. |
| Dashboard → Custom Section Titles | Location to rename the custom section titles |
| Dashboard → Pending Items | Control to hide other users pending items in the same school assignment |
| Events/Items → Antes Exam | Control the functions on an Antes Exam |
| Events/Items → Audiology Therapy | Control the functions on an Audiology Therapy event |
| Events/Items → Blood Exam | Control the functions on a Blood Exam |
| Events/Items → Dental Exam | Control the functions on a Dental Exam |
| Events/Items → Developmental Exam | Control the functions on a Developmental Exam |
| Events/Items → Events | Area to disable the Save/Close button on the event toolbar |
| Events/Items → Group Events → Vision Exam SPOT Template | Location to identify the global templates associated with SPOT device |
| Events/Items → Growth Exam | Control the functions on a Growth Exam |
| Events/Items → Hearing Exam | Control the functions on a Hearing Exam |
| Events/Items → Immunization Dose Administration | Control the functions on a Immunization Dose Administration |
| Events/Items → Medical Procedure Administration | Control the functions on a Medical Procedure Administration |
| Events/Items → Occupational Therapy | Control the functions on a Occupational Therapy encounter |
| Events/Items → Office Visit | Control the functions on an Office Visit including Assessment, Diagnostics, Incidents |
| Events/Items → Oral Exam | Control the functions on a Oral Exam |
| Events/Items → Orientation and Mobility Therapy | Control the functions on a Orientation and Mobility therapy as related to IEP goals |
| Events/Items → Parasitic Exams | Control the functions on a Parasitic Exam |
| Events/Items → Physical Exam | Control the functions on a Physical Exam |
| Events/Items → Physical Therapy | Control the functions on a Physical Therapy Exam |
| Events/Items → Postpartum Visit | Control the functions on a Postpartum Visit |
| Events/Items → Prenatal Visit | Control the functions on a Prenatal Visit |
| Events/Items → Prescription Administration | Control the functions on a Prescription Administration including dose, witness, missed reason |
| Events/Items → Psychological Therapy | Control the functions on a Psychological Therapy. Removal of elements such as clinical notes and service provider |
| Events/Items → Scoliosis Exam | Control the functions on a Scoliosis Exam |
| Events/Items → Speech Exam | Control the functions on a Speech Exam |
| Events/Items → Speech Therapy Exam | Control the functions on a Speech Therapy Exam as it relates to IEP Goals |
| Events/Items → Standing Order Administration | Control the functions on a Standing order including if on or off, dose and dose witness |
| Events/Items → Transportation | Configuration of settings on the appearance of transportation application |
| Events/Items → Tuberculosis Exam | Control the functions on a Tuberculosis Exam |
| Events/Items → Tuberculosis Results | Control the functions on a Tuberculosis Results Exam |
| Events/Items → Vision Exam | Control the functions on a Vision Exam |
| Maintenance → Immunization Exceptions | Area to set exceptions and settings for group immunization letter |
| Maintenance → Medical Problem | Configuration settings for Medical Problems and Medical Alerts |
| Maintenance → Medical Procedure | Configuration settings for a Medical Procedure |
| Maintenance → Prescription | Configuration settings for a prescription order |
| Maintenance → School Closing and Activity | Configuration parameters to set calendar views |
| Mental Health Forms | Setting to turn on or off RBHS forms |
| Person → Student → Basic Information | Settings to turn on or off demographics |
| Person → Student → Emergency Card | Configuration of items to appear on student emergency card |
| Person → Student → Events | Configuration settings on date ranges for default views |
| Person → Student → Forms | Configuration settings to turn on or off specific state forms and health history appraisal |
| Person → Student → Medical | Billing permissions, plans and programs, standing order configuration settings |
| Person → Student → Summary Page → Show 5.1 Progress Notes Comments PDF | Setting turns on or off |
| Person → Student → Summary Page → Show Medical Problem Comment History Option | Setting turns on or off |
| Reports → Immunization Letter | Settings to customize the Immunization Letter for group letters |
List of Included Global Templates
The following is a list of Global Templates that come prepopulated in your HealthOffice Anywhere database.
| Exam Type | Template Name |
| Antes Exam | AN-Pass |
| Developmental Exam | Fail Referral |
| Developmental Exam | Fail Rescreening |
| Developmental Exam | Pass |
| Hearing Exam | Fail Referral |
| Hearing Exam | Fail Scheduled Rescreening |
| Hearing Exam | Pass |
| Office Visit | Abrasion |
| Office Visit | Allergic: Rhinitis |
| Office Visit | Anxiety Attack |
| Office Visit | Asthma |
| Office Visit | Bee Sting (NLT) |
| Office Visit | Bumped Head |
| Office Visit | Cold/Cough |
| Office Visit | Earache – infection (Poss) |
| Office Visit | Earache – Wax/Foreign Body |
| Office Visit | Eye – Foreign Body |
| Office Visit | Eye – injury, Superficial |
| Office Visit | Faculty – BP |
| Office Visit | Faculty Conference |
| Office Visit | Fever |
| Office Visit | First Aid |
| Office Visit | Flu |
| Office Visit | Headache & Stomach Ache |
| Office Visit | Headache |
| Office Visit | Medical Consultation/Follow Up |
| Office Visit | Nosebleed (Intentional) |
| Office Visit | Nosebleed (Unintentional) |
| Office Visit | Parent Conference |
| Office Visit | Stomach Ache |
| Office Visit | Toothache |
| Office Visit | Vomiting |
| Parasitic Exam | Negative Screening |
| Parasitic Exam | Positive Screening – Pediculosis |
| Physical Exam | Pass – Athletic Screening |
| Scoliosis Exam | Negative |
| Scoliosis Exam | Positive – Detected |
| Vision Exam | Fail – Referral |
| Vision Exam | Fail – Schedule Rescreening |
| Vision Exam | Pass |